Working with emuso Lessons

Emuso lessons use a mix of video, text, interactive quizzes and interactive images. Below, we have compiled a guide to list the basic UI features, with short descriptions of what they entail.
We strongly advise that you work through the quick start guides, and read below, before you start the lessons, so that you know where to find the information when you do need it.
Enjoy your musical journey!
Team Emuso
Interacting with Lessons (and Blogs)
Window layout icon
You can see the instrument or the lesson in one window or split-window, using the following icons at the top left of emuso. Use the icons below to change this layout, if you want. You can drag the vertical divider right or left to see more or less of the instrument.

When full-window, the middle icon below is active, coloured green. When the instrument appears full-window, the left icon (a guitar headstock) is active coloured green.
The right icon toggles between one window and split-window ? When inactive (grey), clicking it shows the lesson in the left window and the instrument in the right. The icon turns green. Click again to revert to the previous contents of the one window.
The Interaction Icon
When reading an emuso lesson or practice regime? you will often encounter the icon shown below. This is the interaction icon. This is your invitation to explore some concept, or to be tested on it. Click it to start the interactions. Some interactions switch to split-window as soon as you click on the interaction icon.
![]()
Try clicking the above icon. This lesson will appear split-window, with the lesson left, and the virtual guitar right. A lesson controls box appears. Click on the “lesson full window” button at the far right of emuso, under the small clock, to revert to full screen. Interactions are disabled if the Toolkit is active, and you’ll get a warning message. You can enter the Toolkit when an interaction is active, to do whatever you want, and when you exit the Toolkit, the task you were emgaged with reruns.
Lesson Controls
Most lessons have tests or tasks to do. Here is an example. This box can be dragged. Click the “x” at the top right to dismiss the box.
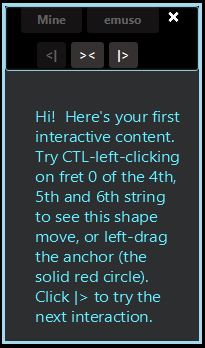
The small block of buttons above the prompt are for? lesson navigation.
- >< is used to retry the current test
- |> is used to move the next test (if any)
- <| is used to move to the previous test (if any)
The retry button may be disabled if the test requires this. The other two buttons will be disabled when there is no other previous or following test.
If the interaction is a test of some sort, emuso will provide you with feedback, by adding “CORRECT” or “INCORRECT” above the prompt.
If the lesson is driven by video, then these navigation controls can be used to navigate across video segments as well. For example, if there are multiple video segments interspersed with tests/tasks, when you click “|>” after the last test in a block of tests, the video will resume playing. Clicking “|>” will jump over that video segment to the start of the next block of tests, if it exists. “<|” can be used analogously, to navigate in the reverse direction.
Getting Corrections to Tests
When taking a test, you can ask emuso to show you the correct answer, by pressing the “emuso” button. You will usually see a change reflected on the virtual instrument, and you can listen to this. Pressing “Mine” changes what’s on the instrument back to your answer, so you can compare and listen.
General instructions for using the instrument with the mouse and keyboard
Please see basics for using the instrument in the quick start guides.
Guitar component and emuso's guitar
Guitar Components
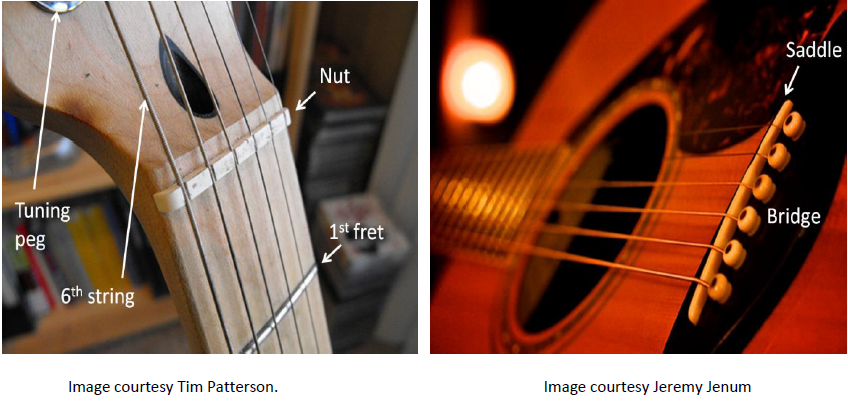
With a six string guitar, there are six tuning heads, fixed into what we call the headstock. Each tuning head has a tuning peg onto which a string can be tied. In this diagram you can just see the tuning peg for the bass string (thickest string). You see the nut at the start of the guitar neck, and along the neck there are several frets (pieces of wire that are embedded into the neck) spaced out at carefully chosen distances.
Each guitar string is anchored to the guitar body by a bridge, crosses the saddle there, and runs the length of the guitar neck without contacting any fret, until it contacts the nut. From there the string winds into the tuning head, which can be turned to tighten or loosen the string. This tension can be adjusted until the string matches an agreed upon pitch (we’ll look at this below).
When you pluck a string, this string length vibrates between the nut and the saddle and creates a sound determined by this length and the weight of the string. You’ll often hear “play the third string open” to mean pluck the third string without holding down any fret. You hear the “open string pitch”.
If you press down a finger just behind a fret (for example, just behind (nearer the headstock) of the 1st fret, the string now contacts that fret, shortening the length that can vibrate. It vibrates from that fret to the saddle. You can think of the nut as fret zero … it’s doing the job for you when you’re not holding your finger down on the string. We’d say “play fret 1” or “hold down fret 1” for example, to mean the above.
Emuso’s Guitar Representation
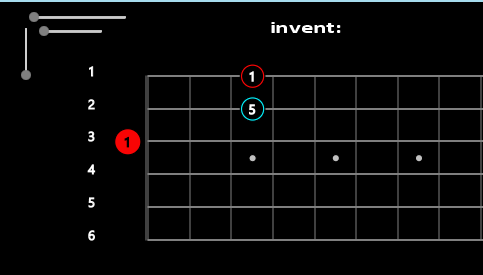
In the next diagram, you can see a shape made up of three notes to be played at the indicated frets: the open 3rd string (the red circle behind the nut) and the 3rd fret on the 2nd and 1st strings.
Compare it to the image below from emuso showing the same shape. Notice that the solid red circle (which we call the anchor) lies behind the double vertical line (our graphics for the nut)

Tuning your guitar
Standard tuning
In standard tuning, the guitar strings are tuned to specific pitches (you’ll learn about pitches in a future lesson) named E2, A2, D3, G3, B3, E4, for strings 6 through to 1 respectively. You can use emuso directly to tune your guitar, or you can use a guitar tuner, or get someone else to play these for you, and you adjust the machine heads until the sounds match. If you tune the guitar by listening to another sound, you’ll notice an aural beating effect as the two pitches get to be nearly the same. This beating slows down as you get closer to matching, and stops when they match.
We’ll use a chord so you can see the effect on its shape, when the tuning changes.
Here is a picture of emuso’s? guitar tuner gadget.

There are 6 rows of buttons, corresponding to the 1st string at the top, and the 6th string at the bottom.
The left button in a row raises that string’s tuning by one semitone with each click. The right button drops the tuning by one semitone with each click. Changing the tuning means that notes will shift towards the nut (raising the tuning) or towards the body (dropping the tuning), to maintain their correct pitch. As the tuning is raised, notes on that string shift towards the nut by one fret per click. As the tuning is dropped, notes on that string shift towards the guitar body by one fret per click.
![]()
- Enter the Toolkit if necessary.
- Click the “Tuner” button, and select “Unlock Tuning Heads”. The tuning widget appears.
- Drag it below the guitar, so you can clearly see the chord
- Click + on the 1st row. The note shifts towards the nut
- Click – on that same row. The note shifts towards the guitar body
- Click the “Tuner” button, and select “Open E”. The shape becomes a straight vertical line.
- Click the “Tuner” button, and select “Standard”. The shape reverts to its original.
- Click the “x” at the top right of the tuner widget to close it.
If you close the tuning gadget while a non-standard tuning is active, the Tuning button remains green. It will revert to grey once you have reverted to standard tuning.


